How to Photograph Jewelry: 8 Steps to Pro Shots
Every piece of jewelry has a story to tell, from the thoughtful craftsmanship of our designers to the rich history of a vintage find. Your photography is the language you use to tell that story. A great photo does more than just show what a piece looks like; it captures its character, its texture, and the way it feels. But getting that perfect shot can feel like a mystery. This guide is designed to demystify the process and show you how to photograph jewelry in a way that highlights its unique personality. We’ll walk you through creating a simple home studio, styling your pieces, and dialing in your camera settings to produce images that are as soulful and special as the jewelry itself.
Key Takeaways
- Soften Your Light to Eliminate Glare: The secret to making jewelry look its best is using soft, diffused light. Avoid harsh, direct light sources and instead use a light tent or bounce your light off a white card to wrap your piece in a gentle glow that minimizes distracting reflections.
- Stabilize Your Camera and Simplify Your Scene: A tripod is essential for getting crisp, in-focus shots every time. Pair this stability with a simple, neutral background and minimal props to ensure your jewelry remains the undisputed star of the photo.
- Use the Right Settings to Capture Every Detail: To get the entire piece sharp, set your camera to a high f-stop (like f/11). This ensures every facet and engraving is crystal clear. Follow up with basic edits to sharpen the image and correct colors for a polished, professional result.
Your Jewelry Photography Starter Kit
Getting started with jewelry photography can feel intimidating, but you don’t need a massive budget or a professional studio to create beautiful images. The right gear makes all the difference, helping you capture the sparkle of a diamond ring or the intricate details of a handcrafted necklace. Think of this as your essential toolkit—a few key items that will set you up for success and make your jewelry look as stunning online as it does in person. Investing in the right foundational equipment from the start will save you countless hours of frustration and help you produce consistently high-quality photos that attract customers.
From the camera you use to the light that illuminates your pieces, each component plays a crucial role. We'll walk through the four must-have items for your starter kit: a capable camera, a macro lens for those all-important details, a tripod for sharp images, and the right lighting tools to make every piece shine. You might be surprised to learn that you can assemble a fantastic kit without breaking the bank. The goal is to control your environment and highlight the unique character of each piece, whether it's a modern design or a treasured vintage find. With these basics covered, you'll have a solid foundation for taking photos that truly do your jewelry justice.
Choose Your Camera: DSLR, Mirrorless, or Smartphone
You might think you need a top-of-the-line camera, but your smartphone is more powerful than you realize. Modern phone cameras are fantastic for capturing high-quality images, especially when you’re just starting out. The key is consistency in your lighting and setup. If you’re ready to invest a bit more, a DSLR or mirrorless camera offers greater control over settings like aperture and focus, which is a huge plus. A DSLR with a special macro lens is the gold standard, as it helps you take incredibly clear, close-up pictures. Whichever you choose, learning its features is more important than the price tag.
Get Up Close: Why You Need a Macro Lens
Jewelry is all about the details—the texture of the metal, the cut of a gemstone, the delicate work of our designers. To capture these fine points, a macro lens is your best friend. This type of lens is designed for extreme close-ups, letting you get sharp, detailed shots without any distortion. When shopping for one, look for a focal length between 60mm and 150mm. Lenses with a focal length shorter than 50mm can make your jewelry look stretched or warped, so it’s best to avoid them. A good macro lens will truly show off the craftsmanship of each piece.
Stay Steady with a Tripod
Even the steadiest hands can’t compete with a tripod. When you’re shooting something as small and detailed as jewelry, the tiniest movement can result in a blurry, out-of-focus image. A tripod holds your camera perfectly still, ensuring every shot is crisp and clear. This is non-negotiable, whether you’re using a smartphone or a DSLR. For an extra layer of stability, use your camera’s 2-second timer or a remote shutter release. This allows you to take the picture without touching the camera at all, completely eliminating the risk of camera shake. It’s a simple step that makes a world of difference.
Light It Right: Softboxes, Tents, and Reflectors
Good lighting is the secret to making jewelry sparkle without harsh glare. The goal is to use soft, diffused light, which wraps around the piece gently and minimizes distracting reflections and deep shadows. You can achieve this by bouncing light off a white wall or a simple piece of white card. An even easier method is to use a light tent or lightbox. These are affordable little studios that create a soft, even glow around your jewelry. They usually come with a white background and built-in LED lights, giving you a professional setup right out of the box. You can even build your own lightbox with a few simple materials.
How to Light Your Jewelry for Perfect Shots
Lighting is everything when it comes to jewelry photography. The right light can make a diamond sparkle and bring out the rich color of a gemstone, while the wrong light can create harsh glares and distracting shadows. Getting your lighting right is the single most important thing you can do to capture the soul of a piece. The good news is, you don’t need a professional studio to achieve stunning results. With a few key techniques, you can make your jewelry shine.
Natural vs. Artificial Light: Which Is Better?
When you're just starting, natural light is your best friend. It’s free, accessible, and renders colors beautifully. The best kind of natural light is bright but indirect. Try setting up your shot near a window on an overcast day. The clouds act as a giant, natural diffuser, softening the light and minimizing harsh shadows. If it’s a sunny day, avoid placing your jewelry in a direct sunbeam, as this will create too much glare. Instead, find a spot where the light is bright but not hitting the piece directly. While natural light is fantastic, artificial light gives you complete control, which is crucial if you're shooting a whole collection of jewelry.
Diffuse Light to Minimize Glare
Whether you choose natural or artificial light, the goal is always to make it soft and diffused. Harsh, direct light creates sharp reflections and dark shadows that hide the beautiful details of your jewelry. Diffusing the light spreads it out, wrapping it gently around the piece for a much more flattering look. If you’re using window light, you can hang a thin white sheet over the window to soften it. For artificial lights, a softbox is an essential tool that does the same job. You can also bounce your light off a white wall or a large piece of white foam board. This creates a broad, soft light source that will make your vintage and estate pieces look absolutely radiant.
Position Your Lights for the Best Effect
Where you place your lights is just as important as the type of light you use. A common mistake is lighting jewelry from the front, which can make it look flat. Instead, you want to create a sense of depth and dimension that highlights the piece’s form and texture. A great starting point is to place your main light at a 45-degree angle to your jewelry, either from the side or slightly above. This angle creates soft shadows that define the shape of the piece, showing off the incredible craftsmanship from our featured designers. You can use one light or two, one on each side, to create a balanced look.
Use White Cards to Fill in Shadows
Once your main light is in place, you might notice some small, dark shadows on the opposite side of your jewelry. This is where a simple white card comes in handy. By placing a small piece of white foam board or even a folded piece of paper opposite your light source, you can bounce some light back into those shadows. This technique, often called "fill light," brightens up the entire piece without adding another harsh light source. It’s a simple but powerful trick that helps highlight every facet of a gemstone and every curve of the metal. Experiment with the angle and distance of the card to control how much light you bounce back.
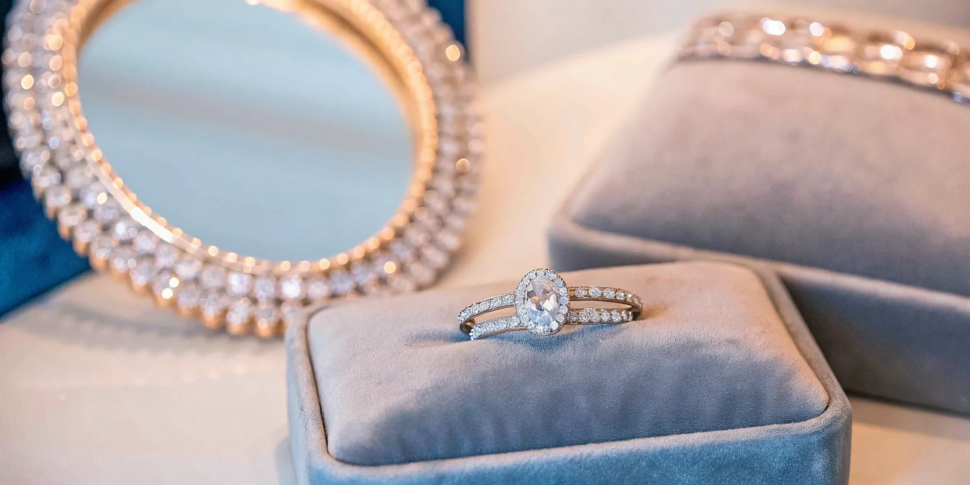
Create Your At-Home Photo Studio
You don’t need a sprawling, professional studio to take stunning photos of your jewelry. In fact, some of the best shots can be captured right from a small corner of your home. The secret is creating a dedicated, controlled environment. Think of it as your personal photo booth, a space you can set up once and return to anytime you need to photograph a new piece. This consistency is what separates amateur shots from professional-quality images and gives your collection a truly high-end feel.
Having a designated at-home studio saves you an incredible amount of time and guesswork. Instead of scrambling to find good lighting or a clean background every time, you’ll have a reliable setup ready to go. This allows you to focus on what really matters: capturing the unique character and intricate details of each piece of jewelry. Whether you’re shooting a sparkling diamond engagement ring or a handcrafted silver bracelet, a consistent environment ensures your entire collection looks cohesive and polished. It’s about creating a simple, repeatable process that delivers beautiful results every single time, letting the soul of each piece shine through.
Designate a Shooting Space
First things first, find your spot. This doesn’t have to be an entire room—a sturdy desk or a small table in a quiet corner will work perfectly. The most important thing is that it’s a space you can consistently use without much disruption. Once you have your surface, focus on the background. A simple, neutral background ensures your jewelry is the star of the show. A clean white backdrop is a fantastic starting point because it won’t cast any strange colors onto the metal or gemstones. You can easily create this with a roll of white paper, a piece of poster board, or even a smooth, ironed white bedsheet. This simple stage allows the true colors and details of your jewelry to pop.
Work with a Light Tent or Lightbox
If you’re going to invest in one piece of equipment, make it a light tent or lightbox. This simple tool is a game-changer for photographing reflective items like jewelry. A lightbox is a small, cube-shaped tent made of translucent white fabric that diffuses light beautifully. It surrounds your piece with soft, even light, which is the key to minimizing harsh glare and dark shadows. Many affordable lightboxes come with built-in LED lights and a variety of backdrops, giving you a complete, portable studio in a box. Using a light tent is one of the easiest ways to give your photos a clean, professional look without a complicated lighting setup.
Control Your Environment for Consistency
Consistency is everything in product photography, and it comes from controlling your environment. Start by securing your camera on a tripod. This is non-negotiable, as it eliminates camera shake and guarantees your images are crisp and in focus, especially when working with small details. Next, take control of the light. It may sound odd, but it’s best to shoot in a dark room where you can block out all ambient light from windows or overhead lamps. This allows your lightbox or softboxes to be the only light source, giving you complete command over how your jewelry is illuminated. This level of control ensures every photo you take has the same professional quality, creating a cohesive look across your entire collection of featured designers.
Style Your Jewelry for the Perfect Shot
Styling is where you get to tell your jewelry’s story. The right setup can highlight the incredible detail in a designer piece or the unique character of a vintage find. Your goal is to create a scene that feels authentic and lets the jewelry shine. Think of it as building a small stage where your piece is the main event. The right props and arrangement will draw the eye directly to the craftsmanship and beauty you want to capture, making the final photo feel both professional and personal.
Keep Your Display Simple
When it comes to styling, less is almost always more. You want your jewelry to be the undeniable star of the photo, and a cluttered background will only compete for attention. Before you add anything to the shot, ask yourself if it serves a purpose. Minimal, relevant props can add a touch of context or texture, but the focus should remain on the piece itself. A simple, clean display ensures that every intricate detail, from a delicate engraving to the facets of a gemstone, is clearly visible and appreciated. This approach lets the inherent beauty of the jewelry speak for itself.
Choose Props That Complement, Not Distract
The props you choose should enhance the jewelry’s aesthetic, not overshadow it. Think about the story behind the piece. Is it modern and sleek, or does it have a rustic, vintage feel? For a contemporary piece, you might use a smooth marble tile or a simple geometric block. For something from our Vintage & Estate collection, a piece of raw linen or weathered wood could be perfect. The key is to add texture and interest that complements the jewelry's theme. Stick to neutral colors and simple surfaces to ensure your props support the main subject without stealing the spotlight.
Secure Jewelry with Putty or Wax
Ever wonder how photographers get rings to stand up so perfectly? The secret is often a tiny, well-hidden dab of museum putty or dental wax. This is one of the best tricks for positioning your jewelry exactly how you want it, whether you’re propping up a ring to show off its stone or angling a pair of earrings just right. The key is to use a very small amount and place it discreetly behind or underneath the piece. This way, you won’t have to edit it out later, saving you valuable time and helping you capture that flawless shot of a stunning bridal ring.
Adapt Your Styling for Different Jewelry Types
Different types of jewelry require different styling approaches to look their best. You can’t photograph a long, delicate necklace the same way you’d shoot a statement cuff. For necklaces, try draping them over a bust or creating elegant curves by placing small boxes under your backdrop. Earrings can be hung from a simple stand or laid flat on a textured surface to showcase their details. For bracelets, you can either lay them flat or gently curve them to give a sense of how they would look on a wrist. Experimenting with different setups will help you find the most flattering angle for each unique piece.
Select the Perfect Background
The background you choose is more than just a backdrop; it’s the stage for your jewelry. A great background makes the piece pop, highlights its best features, and creates a mood that aligns with your brand. The right surface can make a gold necklace look richer, a diamond brighter, and a gemstone more vibrant. The key is to choose a background that complements the jewelry without stealing the show. Think of it as the supporting actor that makes your star—the jewelry—shine.
Use Dark Backgrounds for Gold
Gold jewelry, with its warm, rich tones, often looks its most luxurious against a dark background. The deep contrast makes the metal stand out, drawing the eye directly to its warmth and luster. Think about using materials like black velvet, a dark piece of slate, or a matte black acrylic sheet. While a dark background is a classic choice, a crisp, pure white background can also create a stunning, high-end look for gold jewelry. The key is to create a strong contrast that lets the gold’s natural radiance take center stage. Experiment with both to see which style best fits your brand’s aesthetic.
Try Light Backgrounds for Silver
For silver, platinum, and white gold pieces, a light and airy background is usually the way to go. These cooler metals can sometimes pick up reflections from their surroundings, and a white or light gray background minimizes distracting colors, ensuring the metal’s true tone shines through. A simple white sheet, a piece of white foam board, or a light tent can work wonders. This clean, bright environment helps showcase the intricate details and brilliant shine of pieces in a bridal collection. The goal is to create a soft, even setting that feels fresh and modern, letting the craftsmanship of the jewelry speak for itself.
Go Neutral for Gemstones
When you’re photographing jewelry with vibrant gemstones, the background should support the stone’s color, not compete with it. Neutral backgrounds like soft gray, beige, or off-white are your safest and most effective options. They provide a clean canvas that allows the gemstone’s hue to be the hero. For a more advanced touch, you can use a background with a subtle, complementary color to make the gem pop—for instance, a cool-toned gray behind a fiery ruby. Just be sure to avoid busy patterns or overly bright colors that can distract from the beautiful pieces created by talented designers.
Keep Your Backgrounds Consistent
Consistency is crucial for creating a professional and cohesive look for your online shop or portfolio. While you might use a dark background for gold and a light one for silver, try to maintain a consistent style across all your photos. This means using the same type of texture, lighting, and overall mood. This creates a recognizable brand identity and makes your collection feel curated and thoughtfully presented, much like a beautiful selection of vintage and estate pieces. Pick a few go-to backgrounds and stick with them. This simple step will make your entire gallery look more polished and inviting for shoppers.
Dial In Your Camera Settings
Getting your camera settings right is where the magic really happens. It might sound technical, but once you understand a few key controls, you’ll have the power to capture your jewelry exactly how you envision it. Don’t worry if you’re not a pro—these principles work whether you’re using a DSLR, a mirrorless camera, or even a smartphone with manual controls. Taking a few moments to move beyond "auto" mode will make a world of difference in your final images, transforming a simple snapshot into a professional-quality photo that truly shows off the soul of each piece. Think of your camera as a tool, and these settings are how you tell it precisely what you want it to do. We’ll walk through the most important ones so you can feel confident behind the lens.
Use Aperture for Sharp Focus
Aperture controls how much of your image is in focus, and it’s a game-changer for jewelry. A small aperture (a high f-stop number, like f/11 or f/16) creates a large depth of field, meaning the entire piece of jewelry will be sharp from front to back. This is perfect for showing off the intricate details on a pair of earrings or a complex ring. On the other hand, a wide aperture (a low f-stop number, like f/2.8) creates a shallow depth of field, blurring the background beautifully and drawing the eye to a single focal point, like the center stone of an engagement ring. Experiment with both to see which style best tells your jewelry’s story.
Balance ISO and Shutter Speed
Think of ISO and shutter speed as partners working together to get the right exposure. You'll want to keep the ISO as low as possible—ideally around 100—to get the crispest, cleanest image without any grainy "noise." A low ISO requires more light, which is where shutter speed comes in. Since you’re using a tripod (right?), you can use a slower shutter speed to let in plenty of light without worrying about camera shake. This balance ensures your photos capture the smooth, polished surfaces and brilliant sparkle of your fine jewelry without any distracting grain or blur, resulting in a truly professional shot.
Decide Between Manual and Auto Mode
While auto mode is convenient, shooting in manual mode gives you complete creative control. It allows you to adjust aperture, shutter speed, and ISO independently to achieve the exact look you want. If you’re new to manual mode, it can feel a little intimidating. A great way to ease into it is by using Aperture Priority mode (often marked as 'A' or 'Av' on your camera dial). This lets you choose the aperture you want for your desired depth of field, and the camera will automatically select the right shutter speed for a good exposure. It’s the perfect stepping stone to mastering your camera and getting consistent results.
Shoot from Multiple Angles
When a customer shops online, they can’t pick up the piece and examine it from every side. Your photos need to do that for them. Capturing your jewelry from multiple angles is essential for showing off its dimension, craftsmanship, and unique details. Try a shot from directly overhead, one from a 45-degree angle, and a close-up of a special feature. For a ring, you’ll want photos from the top and the side. For a necklace, show the clasp and the full length. This variety helps a potential buyer feel like they’ve seen the piece in person, giving them the confidence to make a purchase, especially for one-of-a-kind Vintage & Estate treasures.
Edit Your Photos for a Polished Look
Taking the photos is only half the battle; the real magic happens in the editing room. This is your chance to polish your images until they sparkle as much as the jewelry itself. Don't be intimidated by photo editing software. You don’t need to be a graphic designer to make significant improvements. The goal isn’t to change what the piece looks like, but to present it in the best possible light, ensuring the photo accurately represents its real-life beauty.
A few simple adjustments can transform a good photo into a great one, making your pieces look irresistible. Editing helps remove distracting imperfections, corrects colors so your gemstones look true to life, and sharpens details to show off the incredible craftsmanship. A polished, professional image tells customers that you care about quality, building trust from the very first click. Think of it as the final touch that prepares your beautiful jewelry for its online debut.
Start with Basic Edits: Brightness, Contrast, and Color
Once you have your photos loaded into your editing software, begin with the fundamentals. The first things to adjust are brightness, contrast, and color. Is the photo a little too dark? Gently increase the brightness until the piece is clearly visible. Does it look a bit flat? A slight bump in contrast can make the metals and gems pop.
Color is especially important. You want the photo to be an accurate representation of the piece, so use the color correction tools to ensure your whites are pure white and the metal tones are correct. Many photo editing programs have an auto-adjust feature that can be a great starting point, but feel free to make small manual tweaks to get it just right.
Crop for Better Composition
Cropping is one of the simplest yet most powerful editing tools at your disposal. A thoughtful crop can dramatically improve your photo’s composition by removing distracting empty space and drawing the viewer's eye directly to the jewelry. If your original shot has too much background, don’t be afraid to trim it down. The goal is to make the ring, necklace, or pair of earrings the undeniable hero of the image.
Play around with different crops to see what looks best. A tighter crop can highlight intricate details, while a slightly wider one can give a better sense of scale. A good rule of thumb is to eliminate anything that doesn’t add to the photo. This simple step ensures your jewelry commands the full attention it deserves.
Retouch to Enhance Details
Now it’s time to zoom in and focus on the little things. Retouching is where you can clean up any minor imperfections that might have been captured by your macro lens, like a speck of dust, a tiny scratch on the background, or a fingerprint. Most editing software has a spot healing or clone tool that makes these fixes quick and easy.
This is also your opportunity to sharpen the image slightly to make the fine details—like delicate metalwork or the facets of a gemstone—really stand out. Highlighting these features shows off the quality and craftsmanship of the piece, which is exactly what discerning customers are looking for when they browse collections from talented designers.
Ensure Your Edits Are Consistent
As you edit each photo, aim for a consistent look and feel across your entire collection. Using the same background is a great start, but your editing style should also be uniform. If you brighten and sharpen one photo, apply similar adjustments to the others. This creates a cohesive, professional aesthetic for your website or online shop.
Consistency makes your brand look polished and trustworthy. When a customer sees a gallery of images that all share the same clean, bright style, it creates a seamless and enjoyable browsing experience. You can even create a preset with your favorite adjustments in your editing software to streamline your workflow and apply it to all your photos for a perfectly unified look.
Common Jewelry Photography Mistakes to Avoid
Photographing jewelry is a skill, and like any skill, it takes a little practice. The good news is that most of the common slip-ups are easy to fix once you know what to look for. Getting these details right will help you capture the true character and soul of each piece, whether it’s a delicate necklace or a statement ring. By sidestepping these few common mistakes, you can create images that feel professional, polished, and truly do your jewelry justice. Let’s walk through some of the most frequent issues and how you can solve them with simple adjustments.
Avoid Harsh Lighting and Reflections
One of the biggest challenges with jewelry photography is managing light. Because jewelry is often shiny, it acts like a tiny mirror, reflecting everything around it—including you and your camera. Using harsh, direct light, like bright sunlight, will create strong, dark shadows and distracting glares that hide the piece's beautiful details. Instead, you want soft, diffused light. If you notice unwanted reflections on a ring or pendant, try holding a piece of white paper or foam board just out of frame. This simple trick will reflect soft white light back onto the jewelry, minimizing glare and creating a much cleaner look.
Prevent Blurry Photos and Camera Shake
Nothing is more frustrating than a blurry photo, especially when you’re trying to capture the intricate details of a finely crafted piece. Jewelry is small, so even the slightest movement during the shot can result in a soft or out-of-focus image. The easiest way to prevent this is to always use a tripod. It doesn’t matter if you’re using a high-end DSLR or your smartphone; a tripod keeps your camera perfectly still, ensuring your photos are consistently sharp and clear. This stability allows you to use slower shutter speeds in lower light without worrying about camera shake, giving you crisp, professional-quality images every time.
Steer Clear of Inconsistent Styling
When you’re photographing multiple pieces, consistency is key to creating a cohesive and professional look. Jumping between different backgrounds, props, and lighting setups for each shot can make your collection feel disjointed and messy. Decide on a consistent style before you start shooting. Using the same type of background and a similar prop theme for all your photos will give your work a polished, branded feel. This helps viewers focus on the unique qualities of each piece of vintage & estate jewelry rather than being distracted by a chaotic presentation. A unified look shows you’ve put thought and care into your work.
Don't Overcomplicate Your Setup
It’s easy to think you need a ton of fancy equipment and elaborate props to take great photos, but that’s often not the case. A simple, clean setup is usually the most effective. Adding too many props can clutter the frame and draw attention away from the main event: the jewelry. You can get stunning, high-quality results at home with just a few basic tools. Focus on a simple background, good lighting, and a stable camera. Let the piece you’re photographing be the star of the show. After all, the goal is to highlight the incredible work of the designers you’re featuring.
Related Articles
- Vail Custom Engagement Rings: A Buyer's Guide
- The Ultimate Guide to Designer Jewelry Online
- What Is Artisan Jewelry? A Complete Guide
Frequently Asked Questions
Can I really get professional-looking photos with just my smartphone? Absolutely. Modern smartphone cameras are incredibly powerful, and you can capture beautiful, high-quality images with them. The secret isn't the price of your camera, but the control you have over your setup. When you pair your phone with a tripod for stability and use a lightbox for soft, even lighting, you can achieve results that look just as polished as those from a more expensive camera.
If I can only buy one piece of equipment to start, what should it be? Without a doubt, invest in a light tent or lightbox first. It's the single biggest game-changer for jewelry photography. Because jewelry is so reflective, a lightbox solves the most common problem—harsh glare and distracting shadows—by surrounding your piece with soft, diffused light. Many affordable options even come with built-in lights and backdrops, giving you a mini-studio right out of the box.
My photos always look a little blurry. What am I doing wrong? The most likely culprit is a tiny bit of camera shake. Even the steadiest hand can't stay perfectly still, and for detailed subjects like jewelry, that minuscule movement is enough to cause blur. The solution is to always use a tripod. To take it a step further, use your camera's self-timer or a remote shutter. This ensures that the camera is completely untouched the moment the photo is taken, guaranteeing a crisp, sharp image every time.
How do you get rings to stand up so perfectly in photos? This is one of the best behind-the-scenes tricks! The secret is a tiny, hidden dab of museum putty or dental wax. You can place a small ball of it behind the ring to prop it up at the perfect angle. It’s strong enough to hold the piece securely but won't damage the jewelry. This simple tool gives you complete control over positioning so you can show off the stone and design details flawlessly.
My jewelry looks flat and lacks sparkle in my photos. How can I fix this? This usually comes down to the direction of your light. Lighting a piece from straight on can make it look one-dimensional. To create depth and bring out the sparkle, position your main light source at a 45-degree angle from the side or slightly above the jewelry. This creates soft, subtle shadows that define the piece's shape and help the facets of a gemstone catch the light beautifully.
Recent articles
View all
Brooke's Holiday Favorites - 2025
Holly's Holiday Favorites - 2025